What you will learn
The utilization of several IoT use cases with a large number of connected devices requires a powerful and professional update management. To avoid overloading IT resources, it is essential to rollout updates to all devices with a time delay. Therefore, Bosch IoT Rollouts provides professional campaign management.
In this tutorial, you will learn how to configure and manage complex update distributions with the Bosch IoT Rollouts service.
After booking the service, you will first have to set up some connected demo devices with our Java-based Eclipse hawkBit tool. Then, you will use the Bosch IoT Rollouts service to cluster simulated devices into target groups. Finally, you will create an update that you will rollout to the simulated devices.
What you need to install and prepare
- A Java Development Kit 1.8 (JDK)
- A web browser
- Maven
- Eclipse hawkBit device simulator tool
Tasks to complete


In this section, you will:
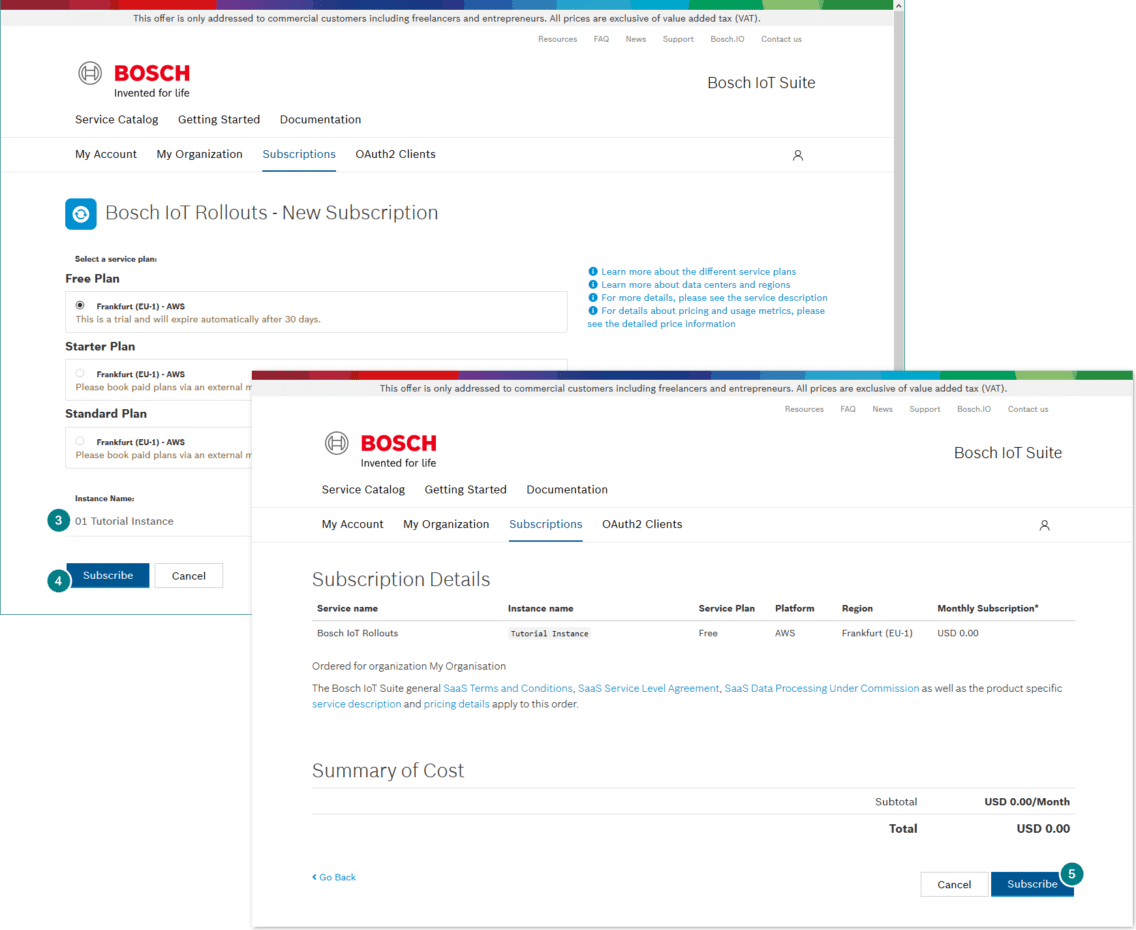
Subscribe to the Bosch IoT Suite Rollouts Service by following these steps:
- Navigate to Service Subscriptions.
- Click New Subscription.
- Provide an Instance Name.
- Click on the Subscribe button.
- Confirm your subscription details by clicking the Subscribe button.
The approval of your subscription might take a few seconds.
You can either clone or download the git repository of the Eclipse hawkBit device simulator as .zip file to your computer.
Find the repository here: https://github.com/eclipse/hawkbit-examples.
During the Maven building process, you need to include your specific Bosch IoT Rollouts credentials in the Eclipse hawkBit device simulator application. In order to do so, follow these steps.
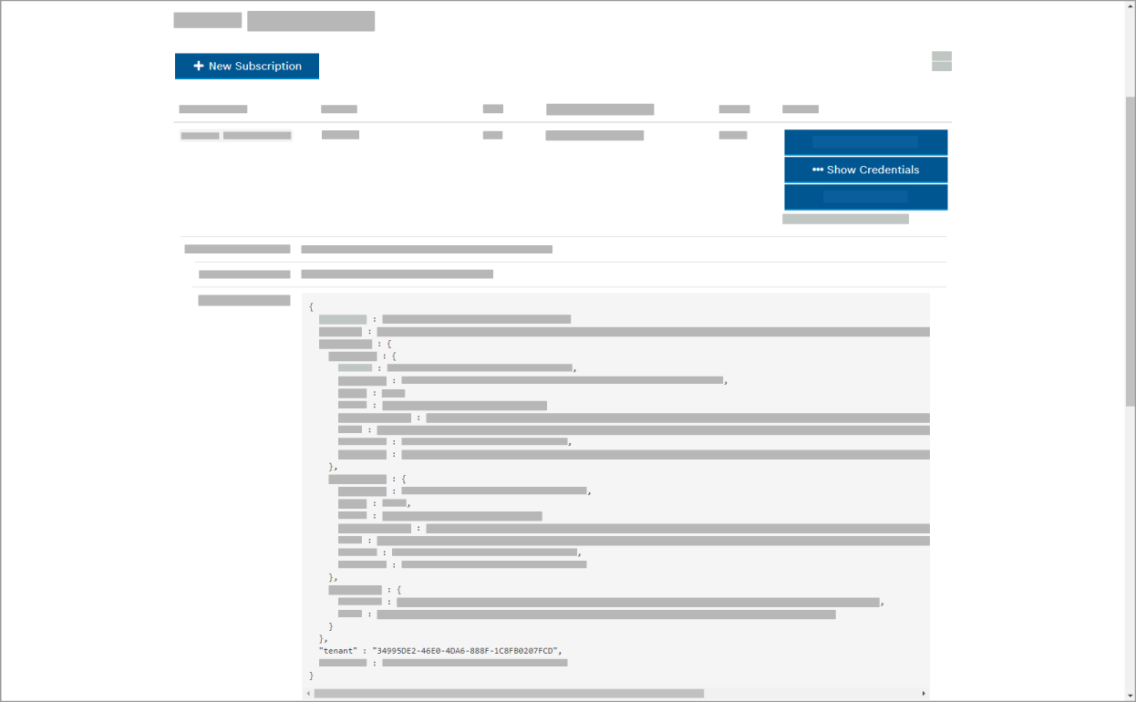
Copy your tenant ID from your Bosch IoT Rollouts subscription
- Navigate to Subscriptions.
- Click Show Credentials in the specific row of the subscription.
- For the tenant ID, scroll down in the Binding Credentials section.
Modify the application.properties file
- Navigate to: ../hawkbit-examples/hawkbit-device-simulator/src/main/resources/application.properties.
- Open the application.properties file.
- Modify the following three lines of the code as follows (remember to delete the brackets):
hawkbit.device.simulator.amqp.enabled=false ... hawkbit.device.simulator.default-tenant=<your_tenant> - Open your console and navigate to the Eclipse hawkBit project directory.
- Run the command:
mvn install
Maven starts searching and installing all project files (pom.xml). This might take a few moments.
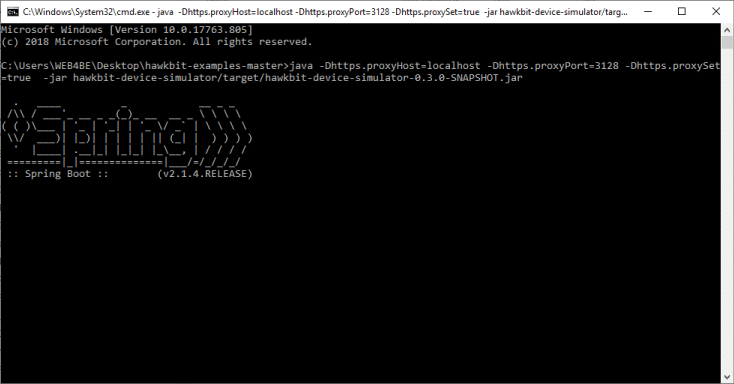
To run the Eclipse hawkBit device simulator application on your computer, you need to open your console and navigate to the project directory. Depending on your system and network setup, you have the following options to proceed:
- If you are not working behind a proxy server, use the following command without any modifications:
java -jar hawkbit-device-simulator/target/hawkbit-device-simulator-0.3.0-SNAPSHOT.jar - If you are behind a proxy server, modify the following command by replacing your port (make sure to delete the pointy brackets):
java -Dhttps.proxyHost=localhost -Dhttps.proxyPort=<####> -Dhttps.proxySet=true -jar hawkbit-device-simulator/target/hawkbit-device-simulator-0.3.0-SNAPSHOT.jar
In this step, you will build a simulation environment with several demo devices. You will use a web browser to interact with your already running Eclipse hawkBit device simulator application by entering URLs such as:
http://localhost:8083/start?amount=##&name=ABCdevice&api=ddi&gatewaytoken=<xxxxxxxxxxxxxxxxxxxxxxxxxxxxxxxxxx>&polldelay=10&endpoint=https://device.eu1.bosch-iot-rollouts.comFind and copy your gateway security token
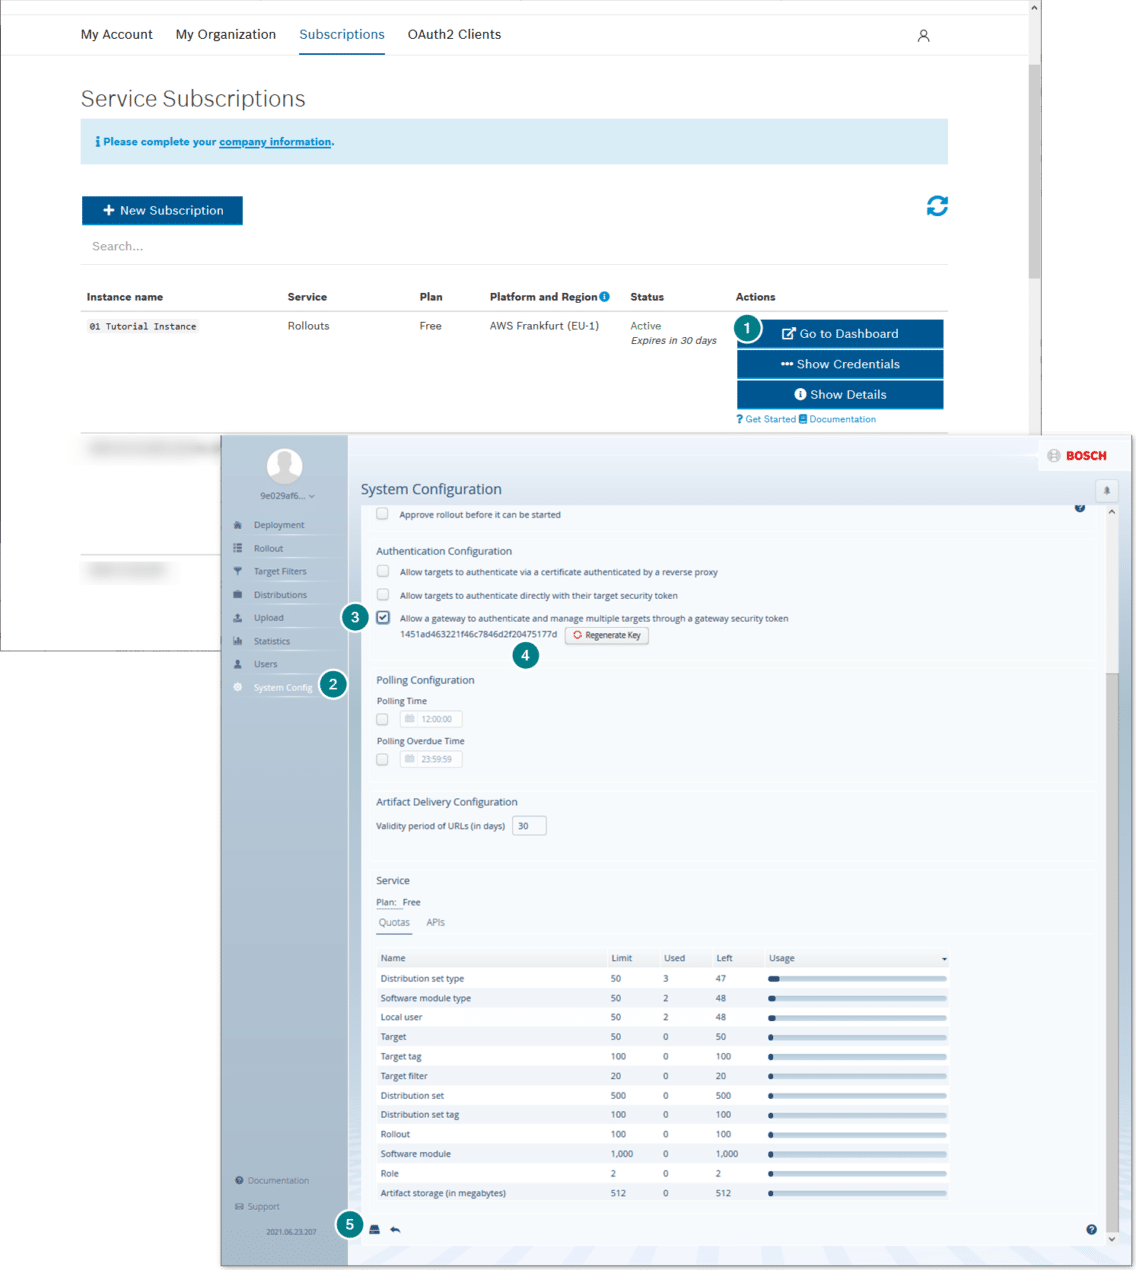
- Navigate to your booked Bosch IoT Rollouts service by clicking Go to dashboard in your subscribed Bosch IoT Rollouts instance.
- Click System Config on the left navigation bar.
- Activate the Allow a gateway to authenticate and manage multiple targets through a gateway security token checkbox.
- Copy the security token.
- To confirm your changes, click the Save icon.
Adding devices to your Bosch IoT Rollouts instance
In the next steps, you will add 45 devices in three groups (emea_devices, apac_devices and amer_devices) to your Bosch IoT Rollouts instance.
- To do so, modify the following URLs by replacing all <XXXX> with your security token:
http://localhost:8083/start?amount=15&name=emea_device&api=ddi&gatewaytoken=<XXXX>&polldelay=10&endpoint=https://device.eu1.bosch-iot-rollouts.comhttp://localhost:8083/start?amount=15&name=apac_device&api=ddi&gatewaytoken=<XXXX>&polldelay=10&endpoint=https://device.eu1.bosch-iot-rollouts.comhttp://localhost:8083/start?amount=15&name=amer_device&api=ddi&gatewaytoken=<XXXX>&polldelay=10&endpoint=https://device.eu1.bosch-iot-rollouts.com - Copy each URL and paste it in your web browser. You will receive the following response after confirming the URL:
“Updated 15 DDI_HTTP connected targets!”
- Navigate to Subscriptions.
- To open the Bosch IoT Rollouts service, click Go to Dashboard.
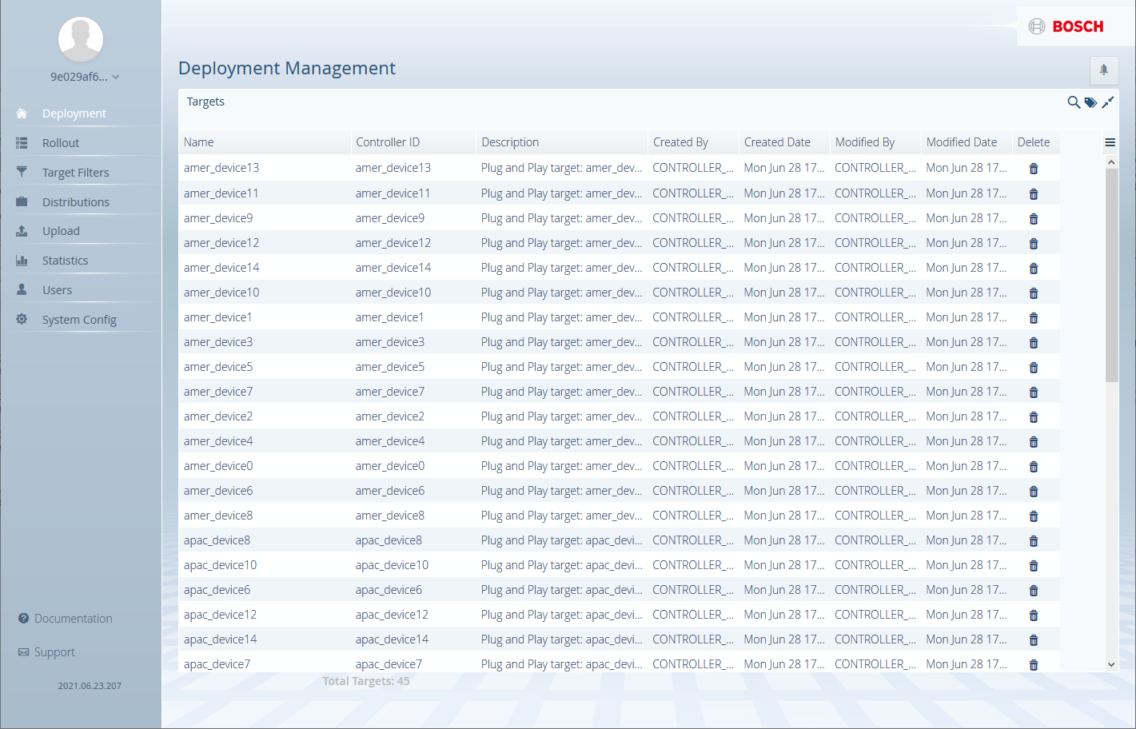
- Navigate to the Deployment Management section.
All 45 devices are visible in the Deployment Management section of your Bosch IoT Rollouts instance.
In the next steps, you will define target groups for your Bosch IoT Rollouts campaign.
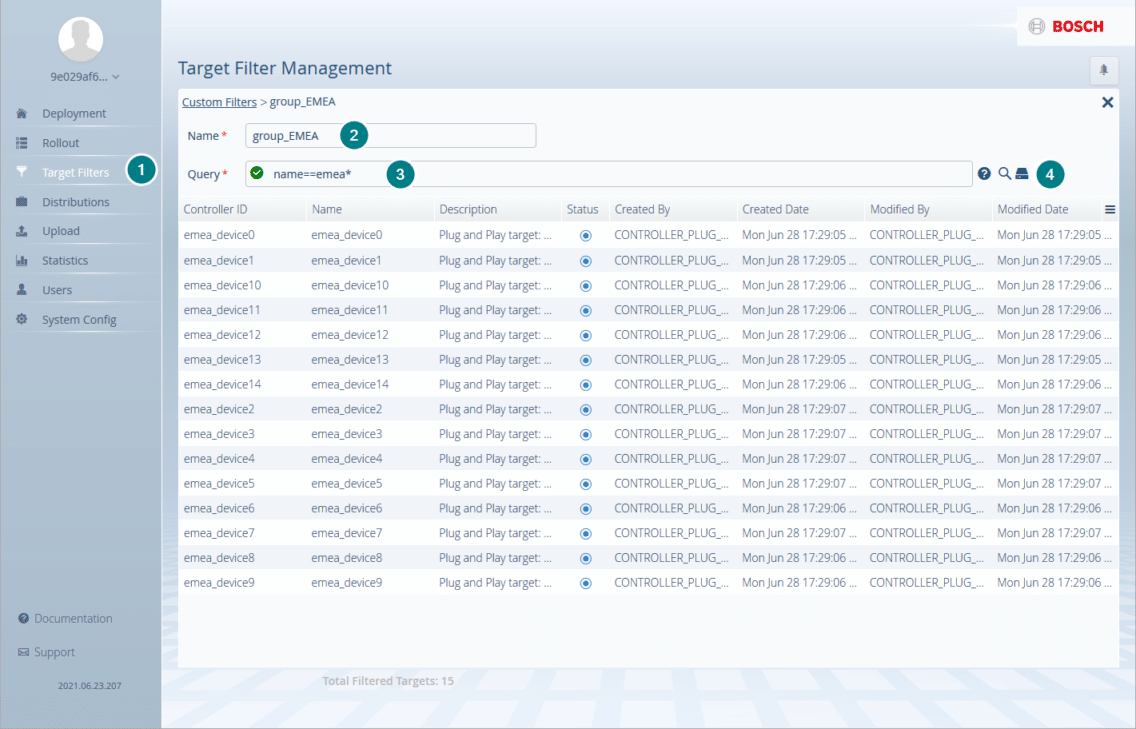
- Within your Bosch IoT Rollouts instance, navigate to Target Filters.
- To create a filter for each of the following four groups, click the + icon.
- Provide a name and the appropriate query for each new filter as listed below:
Name Query All_devices description==Plug*group_EMEA name==emea*group_APAC name==apac*group_AMER name==amer* - To save each filter, click the Save icon.
In the next steps, you will configure the update you want to send or deploy to your simulated devices.
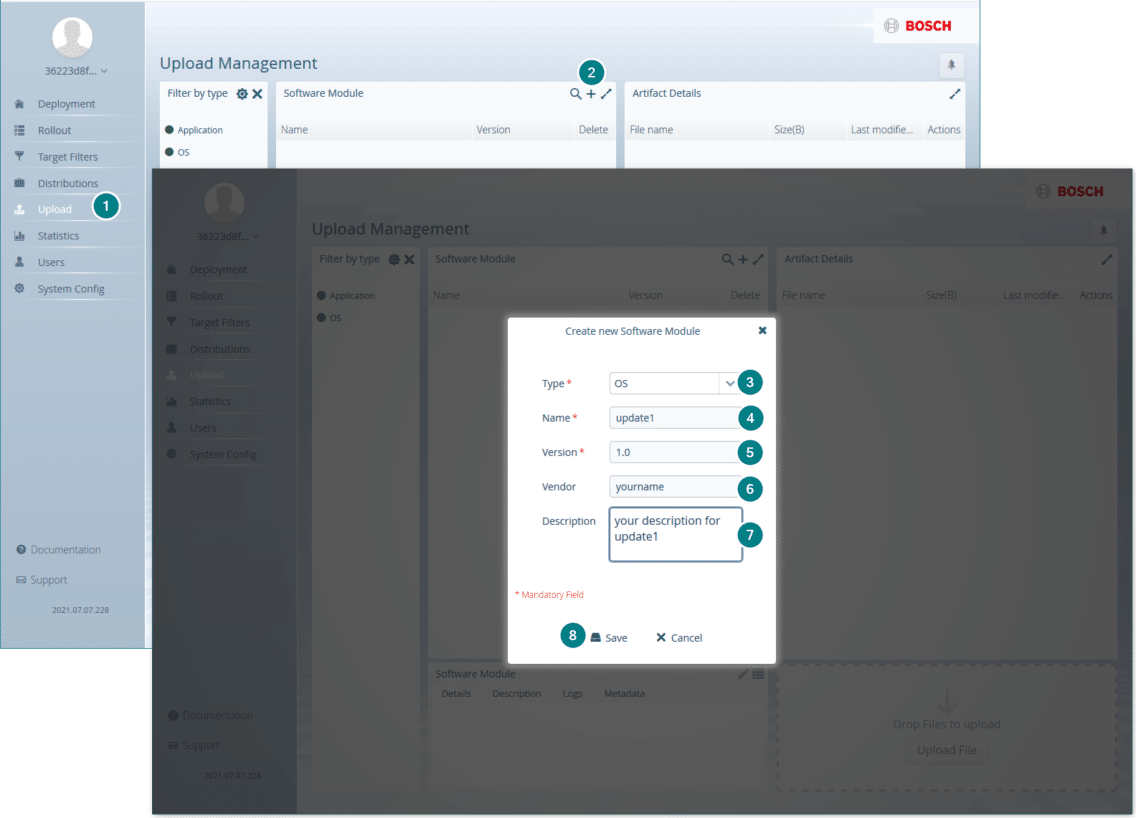
- Navigate to the Upload Management section.
- In the Software Module pane, click the + icon.
- Choose OS from the Type drop-down list.
- Name the software module, e.g. update1.
- Type in the version (e.g. 1.0) in the Version field.
- Optionally, fill in the Vendor field with, e.g. your name.
- Optionally, add a description to your new module.
- To save the input, click the Save icon.
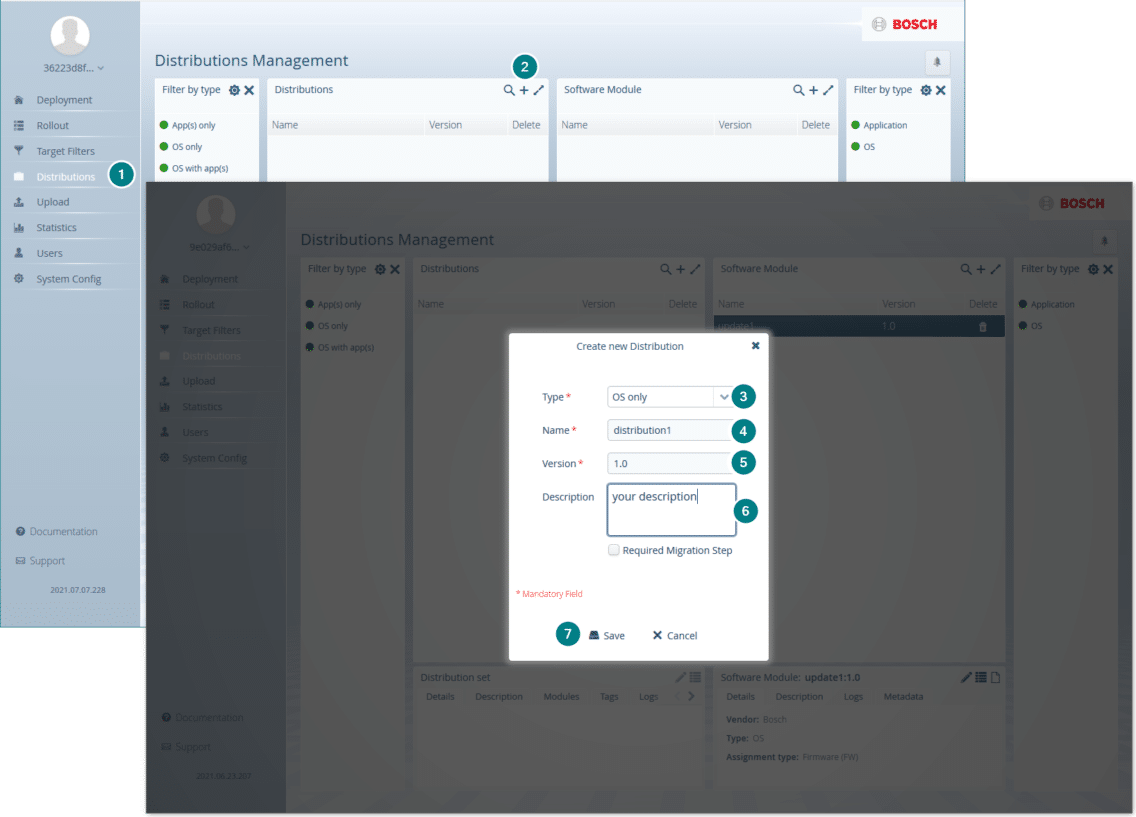
A distribution can contain several software modules. In the next steps, you will configure the distribution, which will contain the previously created update.
- Navigate to the Distributions Management section.
- Click on the + icon in the Distributions pane.
- Choose OS only from the Type drop-down list.
- Name the distribution, e.g. distribution1.
- Type in the version (e.g. 1.0) Version field.
- Optionally, add a description to your new distribution.
- To save your input, click the Save icon.
- To assign the previously created update, drag it from the Software Module section to the Distributions section.
All assigned software modules are highlighted green when you click the Distribution section next time.
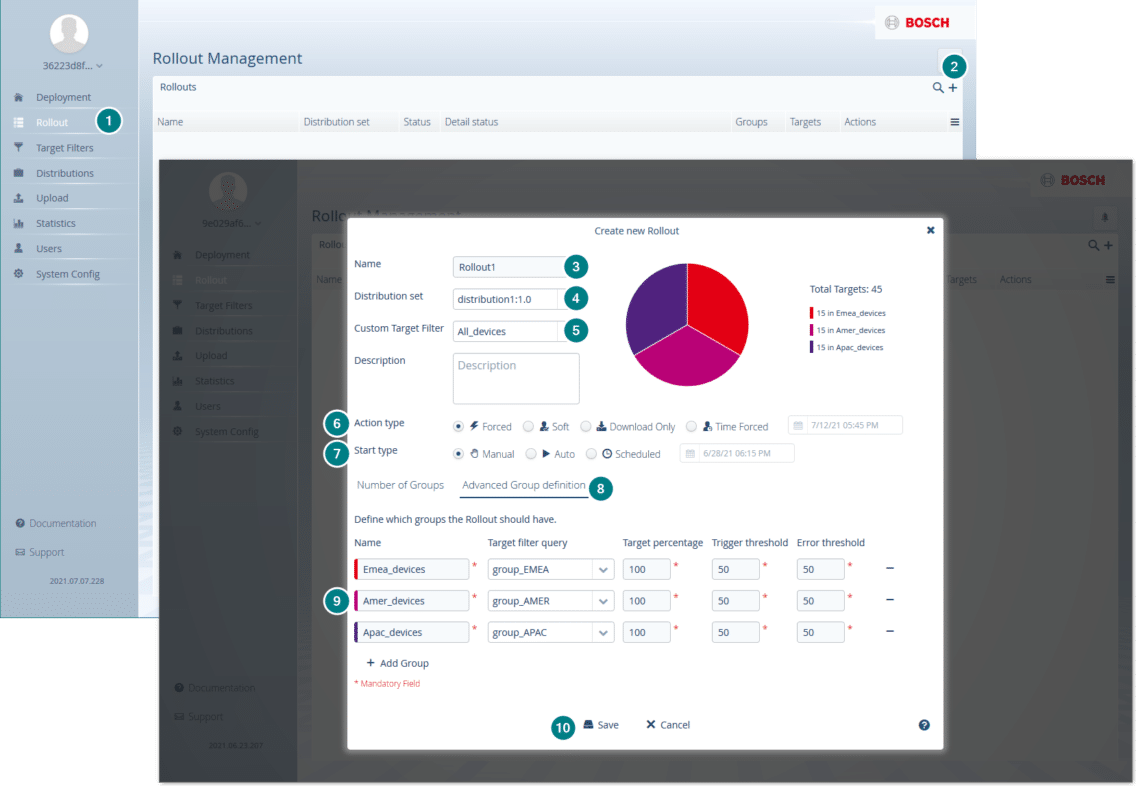
In the next steps, you will create a rollout campaign by assigning distributions to targets (devices) or to target groups (clusters of devices).
- Navigate to the Rollout section.
- To create a new rollout campaign, click the + icon.
- Name your new campaign, e.g. Rollout1.
- Choose the previously created distribution from the Distribution set drop-down list.
- Choose All devices from the Custom Target Filter drop-down list.
- Select Forced from the Action type selection.
- Select Manual from the Start type selection.
- Click Advanced Group definition.
- Add all three groups you previously added and name them.
Additionally, you can define thresholds.
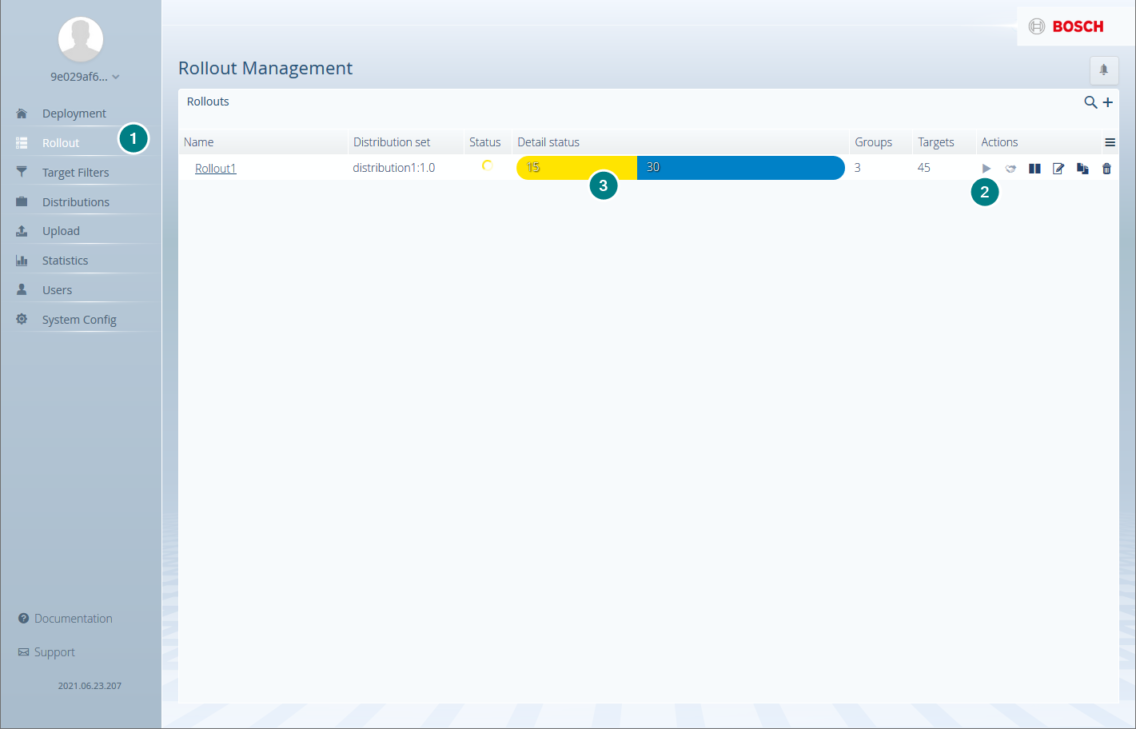
During the final step, you will run the rollout campaign.
- Navigate to your Rollout Management section.
- Click the Play icon.
- Watch the progression on your rollouts.
The service will distribute the update group-wise. It will start with the first group in the list. Depending on the defined thresholds, the service will begin starting the rollout for the next group.